A proxy server acts as an intermediary between your device and the internet, routing your internet traffic through its servers. proxy settings allow you to configure how your device connects to the internet through a proxy server. Understanding and properly configuring your proxy settings is essential for maintaining a secure and efficient internet connection.
Why Check Proxy Settings?
Checking your proxy settings is important for several reasons:
- Security: Proxy servers can help protect your device from cyber threats by filtering out malicious content and monitoring internet traffic.
- Privacy: Proxy servers can mask your IP address, making it more difficult for others to track your online activities.
- Access: Proxy settings can be used to bypass content restrictions and access websites or online services that may be blocked in your location.
- Performance: Properly configured proxy settings can improve internet speed and reduce latency by routing traffic through more efficient servers.
How to Check Proxy Settings on Windows
- Open the Settings app: Press the Windows key + I to open the Settings app.
- Navigate to Network & Internet: Click on the “Network & Internet” option.
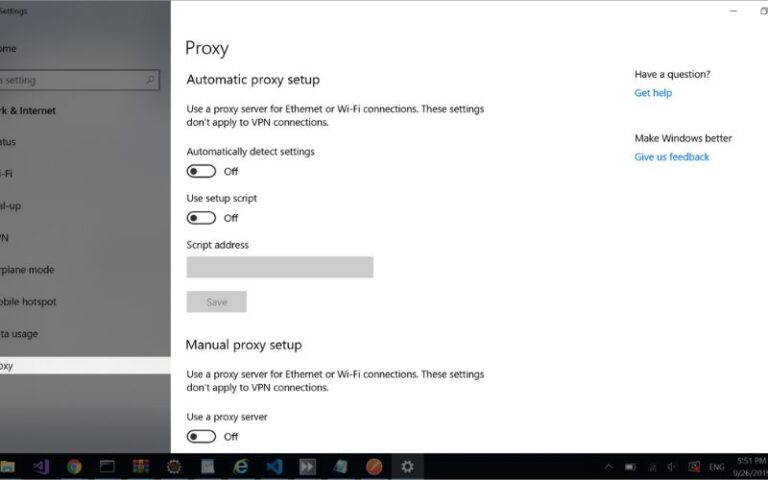
- Select Proxy: Under the “Network & Internet” settings, click on the “Proxy” option.
- Review your proxy settings: In the “Proxy” settings, you’ll see the current proxy configuration for your device. Check if the “Use a proxy server” option is enabled and review the proxy server address and port number.
How to Check Proxy Settings on Mac
- Open System Preferences: Click on the Apple icon in the top-left corner of your screen and select “System Preferences”.
- Navigate to Network: Click on the “Network” icon.
- Select your active network connection: In the “Network” window, select the network connection you’re currently using (e.g., Wi-Fi or Ethernet).
- Click on the “Advanced” button: At the bottom of the “Network” window, click on the “Advanced” button.
- Check the Proxy tab: In the “Advanced” network settings, click on the “Proxy” tab to review your current proxy configuration.
How to Check Proxy Settings on Chrome
- Open the Chrome menu: Click on the three-dot menu icon in the top-right corner of the Chrome window.
- Select “Settings”: From the menu, choose the “Settings” option.
- Navigate to the “Security and privacy” section: In the Settings menu, scroll down and click on the “Security and privacy” section.
- Click on “Cookies and other site data”: Under the “Security and Privacy” section, click on the “Cookies and other site data” option.
- Review the proxy settings: In the “Cookies and other site data” settings, you’ll find the “Proxy” section, where you can review your current proxy configuration.
How to Check Proxy Settings on Firefox
- Open the Firefox menu: Click on the three-line menu icon in the top-right corner of the Firefox window.
- Select “Settings”: From the menu, choose the “Settings” option.
- Navigate to the “Network Settings”: In the Settings menu, scroll down to the “Network Settings” section.
- Click on “Settings”: Under the “Network Settings” section, click on the “Settings” button.
- Review the proxy settings: In the “Connection Settings” window, you’ll find the proxy settings, where you can review your current configuration.
How to Check Proxy Settings on Internet Explorer
- Open the Internet Explorer menu: Click on the gear icon in the top-right corner of the Internet Explorer window.
- Select “Internet options”: From the menu, choose the “Internet options” option.
- Navigate to the “Connections” tab: In the “Internet Options” window, click on the “Connections” tab.
- Click on “LAN settings”: Under the “Connections” tab, click on the “LAN settings” button.
- Review the proxy settings: In the “Local Area Network (LAN) Settings” window, you’ll find the proxy settings, where you can review your current configuration.
How to Check Proxy Settings on Safari
- Open the Safari menu: Click on the Safari menu in the top-left corner of the screen.
- Select “Preferences”: From the menu, choose the “Preferences” option.
- Navigate to the “Advanced” tab: In the “Preferences” window, click on the “Advanced” tab.
- Click on “Change Settings”: Under the “Proxies” section, click on the “Change Settings” button.
- Review the proxy settings: In the “Network” window, you’ll find the proxy settings, where you can review your current configuration.
Troubleshooting Common Proxy Settings Issues
If you’re experiencing issues with your proxy settings, here are some common problems and troubleshooting steps:
- Incorrect proxy server address or port number: Double-check the proxy server address and port number to ensure they are correct.
- A proxy server is down or not responding: Try accessing the proxy server directly to see if it’s available and functioning properly.
- Proxy settings are conflicting with other network settings: Ensure that your proxy settings are not interfering with other network configurations, such as VPNs or firewall settings.
- Proxy server requires authentication: If the proxy server requires a username and password, make sure you have the correct credentials.
- Proxy settings are not being applied: Verify that your proxy settings are being saved and applied correctly by your device or browser.
Conclusion
Properly configuring your proxy settings is essential for maintaining a secure, efficient, and accessible internet connection. By following the steps outlined in this article, you can easily check and manage your proxy settings on various devices and browsers. Remember to troubleshoot any issues that may arise and keep your proxy settings up-to-date to ensure optimal internet performance and security.
If you’re still having trouble with your proxy settings or need further assistance, don’t hesitate to reach out to our support team. We’re here to help you resolve any issues and ensure your internet connection is working at its best.

